Via command line functions you can create servers by choosing the operational system you need, the setting and location of server.
The main advantages of CLI are the automation of the instances creation process and the possibility of integration into an already existing project.
For creating instances via command line you need to prepare a platform where the openstack utility has to be installed. This can be an existing virtual server or even a personal computer. We recommend you to use Ubuntu OS.
In our case we will use an existing virtual server as a platform.
Openstack utility installation and authorization with Public Cloud user in a Horizon control panel.
Open the server console which you intend to manage the Public Cloud service from.
install an Openstack utility:
update packages via command: apt update.
install the required package: apt-get -y install python-openstackclient.
Open the "Public Cloud" service activation email.
Click on the link next to "Openstack Dashboard URL" (шаг-1)
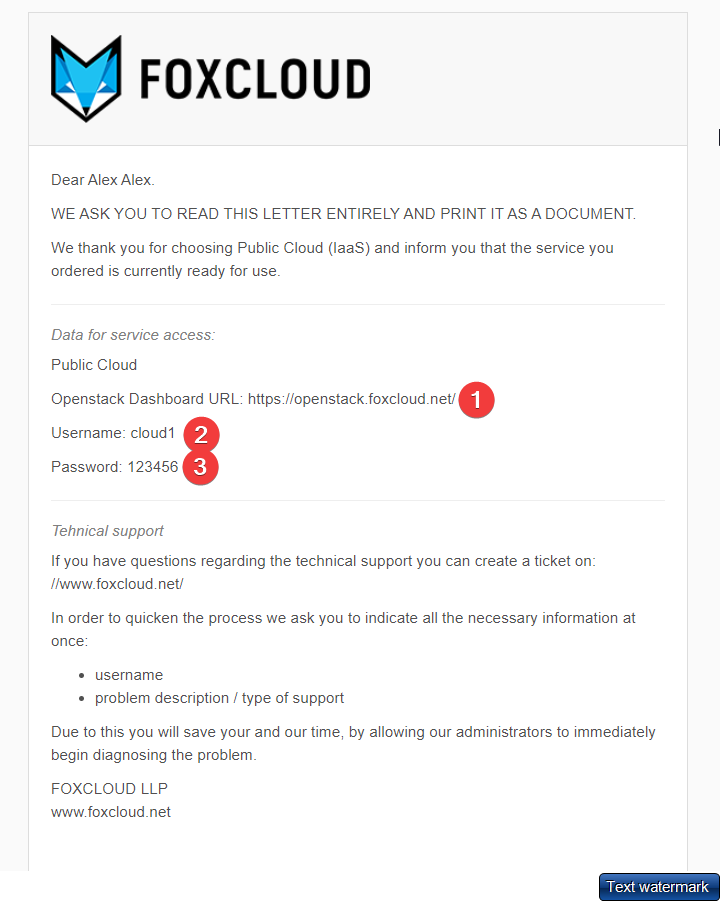
in the field "UserName" from the opened window, enter "Username" (step-2),
in the field "Password" enter the password from the service activation email (step-3) and click on the "Connect" button

You have logged into Horizon control panel. Access the API Access tab.

Open the Download OpenStack RC File drop-down list box and click on Openstack RC File (Identity API v2.0). The save configuration file dialog box will open.

Download the openstack.sh file that contains credentials required for openstack utility (where project_name is the name of your project).
Put the contents of this file into the file on virtual server /root/cloud1-openstack.sh (for example).
Then run the next command:
source /root/cloud1-openstack.sh
You will be asked to enter the password:
Please enter your OpenStack Password for project cloud1 as user cloud1:
Copy your password from the service activation email, go to the console, click the right mouse button or press Shift + Insert keys and press Enter
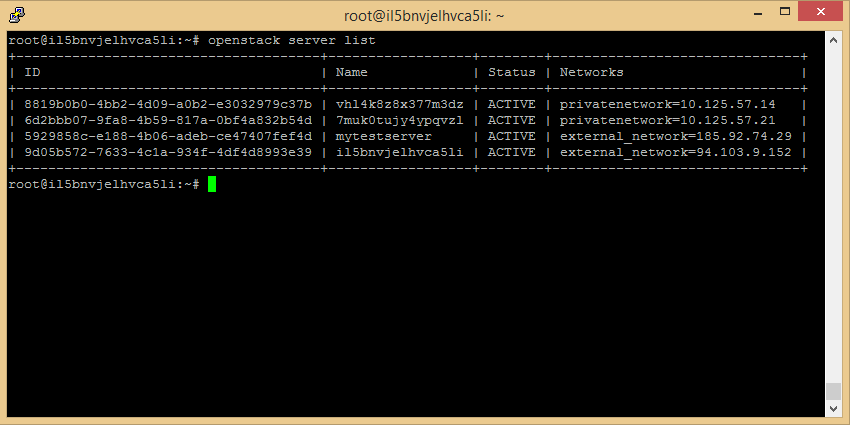
Test the openstack utility via the command:
openstack server list
The response will return the table of your instances in Public Cloud.
Defining instance parameters.
The template of server creating command is the following:
openstack server create
\
--config-drive True --user-data \
--flavor \
--image ![]() \
\
--networkParameters:
- server name
- the server configuration is determined by the parameters: vCPU; RAM; Disk.
![]() operating system image
operating system image- network that is being used: both a public network and a local one can be used
- A user file that is used to set meta data. For example, to set passwords.
For example, we will create a server with the following parameters:
Instance name: server_01
Location: The Netherlan(NL2)
ОС: Centos 7.X
Password: root_password
Configuration: 4GB RAM; 2 CPU; 40GB Drive;
You have to set the server location:
The following locations are currently available for creating servers:
- Europe NL2
- USA US4
- Russia RU1
- Moldova MD1
To select the desired region, you need to run the command: #export OS_REGION_NAME=NL2
Determine the server configuration.
The server configuration is determined by the Flavor variable and there are about dozens of configurations that are available by default. Openstack also provides the possibility to create custom configurations.
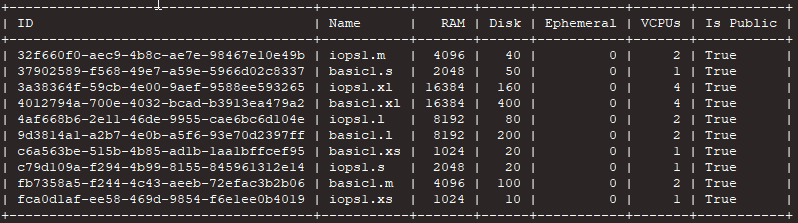
You can get the list of available configurations via the command
#openstack flavor list
Name of the server configuration you need (Flavor): iops1.m
Server operating system (image)
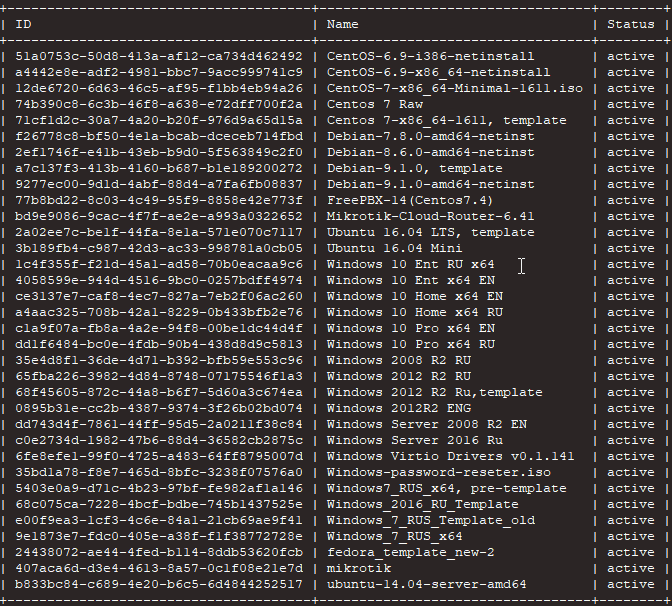
You can get the list of available images via the command #openstack image list
The images are divided into two types: bootable disk images and ready-to-go system templates.
The system templates which you can create a server from have a characteristic naming: <template name>, template.
To facilitate the search by images you can make grep by templates, and then by the name of the operating system you are interested in:
#openstack image list | grep -i template | grep -i centos
Network
While creating a server, you can specify a local or an external network.
The list of networks can be obtained via the command #openstack network list
To assign the server a public IP address select the “external_network”
Server password
To set a password for server via CLI you have to use the configuration disk and the meta-data file.
For this you need to create a file with the desired password. Please, replace YOUR_PASSWORD in the command below with a strong server password.
# touch user-data && echo "password: YOUR_PASSWORD" > user-data
Server creation.
After you have defined all the parameters described above, you can start server creation:
openstack server create "server_01" \
--config-drive True --user-data user-data\
--flavor iops1.m \
--image "Centos 7-x86_64-1611, template" \
--network external_network
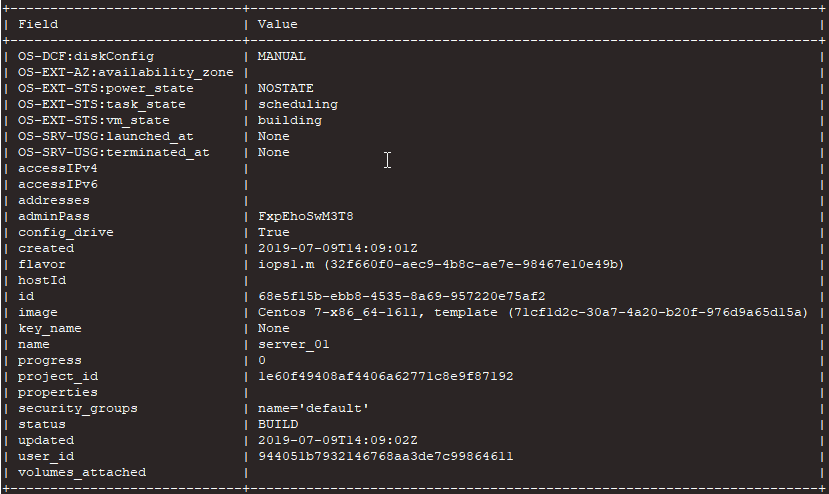
After running the command, the server will have “Build” status
After the successful creation the status will change to “Active” and the server becomes available.
The #openstack server list command will display the list of available servers.
In the table displayed via this command you can check the server status, and the IP address for connecting to the server via SSH.
Our opinion:
A command line management is more difficult than management via the Horizon control panel or a Foxcloud customer control panel, but by using it you can debug errors or understand very easily how the commands in Openstack work.